

Category: Recipes
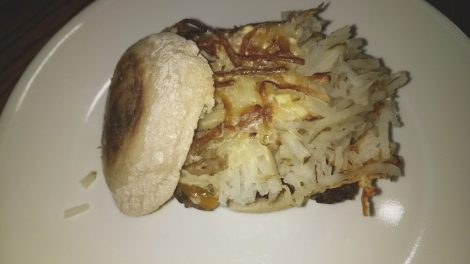
Venison breakfast sandwiches
Ingredients:
2 lbs. venison breakfast sausage
6 English muffins
Frozen hash browns, enough for 6 servings
6 slices cheese
6 eggs, beaten
Salt
Pepper
Directions:
Add salt and pepper to beaten eggs; set aside.
Form venison sausage into six patties, cook in skillet until done.
While sausage is cooking, cook hash browns according to package directions.
Just prior to hash browns being done, cook scrambled eggs in skillet until soft set.
Assemble breakfast sandwiches: English muffin bottom, egg, venison sausage, cheese, hash brown, English muffin top.
Toast sandwiches in oven at 350 degrees for 5 – 10 minutes.
This post was originally shared on the GrowingDeer Facebook page. Click this link to read the original post and comments.
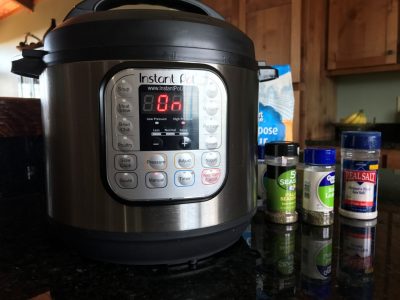
Savory Cubed Venison Stew (An Instant Pot Recipe)
Ingredients:
Herb mayonnaise:
Mix together in a separate bowl:
1 ½ cups Mayonnaise
1 ½ tablespoons Italian seasoning blend
Seasoned Flour:
Mix together in a separate bowl:
2 cups all purpose flour with the following herbs: ½ tsp. garlic, ½ tsp. thyme, ½ tsp. basil, ½ tsp. oregano (OR 1 ½ – 2 tsp. Italian seasoning blend + the garlic), and salt and pepper to taste.
Stew Mixture:
2 lbs. venison roast cut into 1 inch cubes
1 tablespoon canola oil
2 celery sticks roughly chopped/sliced
½ cup onion, chopped
2 cups water
4 beef bouillon cubes
2 tsp. thyme
1 bay leaf
¾ stick butter
Salt and pepper to taste
Directions:
- Set the Instant Pot to sauté function, add canola oil.
- Mix Italian herb blend into the mayonnaise to make an herb mayonnaise. Dredge the cubed venison in the seasoned flour.
- Place venison into the Instant Pot. Cook for 2 minutes. Add the onion and celery. Let the floured venison brown just slightly. It’s better to err on being barely brown than to be overly brown and crispy. Stir occasionally.
- Add the remaining ingredients.
- Put the lid on the Instant Pot and seal. Use the manual setting timed to 40 minutes with natural pressure release.
- Enjoy over rice (which can also be cooked in the Instant Pot!).
Recipe Note:
This can be cooked on the stove top. Follow the same steps but use a large pot. Sauté/brown the meat and vegetables on a medium high temperature. Add the remaining ingredients. After heating thoroughly (but not boiling), turn the heat to low. It will take up to 3 hours for it to tenderize, stir occasionally and watch your water/liquid levels. If it starts to become dry, add more water and stir. Hint: for the stove top cooking method it is better if your meat is in smaller ¾ inch cubes.
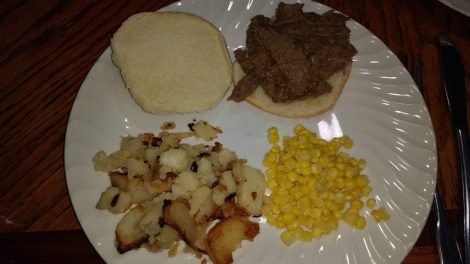
Venison BBQ Sandwiches
Ingredients:
2 pounds sliced venison
4 tablespoons butter
½ onion, sliced
½ cup yellow mustard
½ cup brown sugar, packed
½ cup cider vinegar
1 tablespoon dry mustard
Dash of red pepper
Salt, to taste
Hamburger buns
Directions:
Cook the onion in butter until soft.
Add the yellow mustard, brown sugar, cider vinegar, dry mustard, red pepper and salt.
Simmer until the brown sugar is dissolved.
Put sliced venison in slow cooker.
Pour sauce over venison.
Cook on low for 8 hours.
Serve venison on hamburger buns with toppings of your choice.
This post was originally shared on the GrowingDeer Facebook page. Click this link to read the original post and comments.
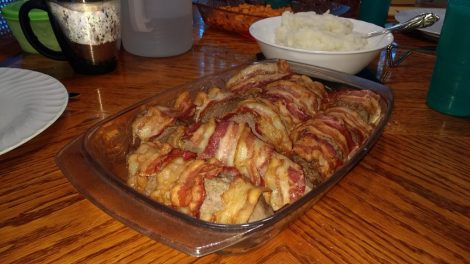
Bacon-Wrapped Venison Loin
Ingredients:
1 lb. bacon
2 lbs. venison tenderloin
1 – 2 teaspoons olive oil
1/4 teaspoon onion powder
Kosher salt, to taste
Pepper, to taste
2 tablespoons butter
8 oz. sliced white mushrooms
2 cloves garlic, minced
1/2 cup heavy whipping cream
Directions:
Preheat oven to 375 degrees.
Place bacon on a slotted baking pan.
Bake bacon in the preheated oven until halfway cooked, about 10 minutes.
Set bacon aside.
Brush venison with olive oil and then season with onion powder, salt, and pepper.
Place tenderloins into a roasting pan.
Cook venison tenderloin for about 1 hour until almost done (145 degrees).
Add bacon to top of venison and put back in oven for 15 – 20 minutes or until venison is done (160 degrees) and bacon is crisp.
Start the cream sauce by sautéing mushrooms in butter until soft.
Add garlic to mushroom and butter and sauté for another 1 – 2 minutes.
Add cream and simmer until sauce is heated throughout.
Serve sauce with tenderloins.
This post was originally shared on the GrowingDeer Facebook page. Click this link to read the original post and comments.
The original recipe, Bacon-Wrapped Venison Tenderloin with Garlic Cream Sauce, can be found here.
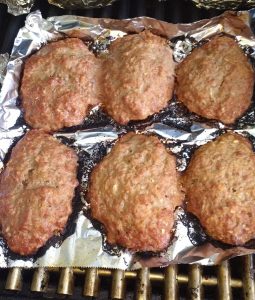
Grilled Venison Mini Meatloaves
Ingredients:
1 cup quick cooking oatmeal
1 1/3 cup milk
1 package dry onion soup mix
1 egg, beaten
1/4 cup ketchup
1 tablespoon Worcestershire sauce
1 1/2 lbs. ground venison
1 lb. ground chuck
Directions:
- Mix oatmeal with milk and let stand for 5 minutes.
- Mix in all other ingredients.
- Shape into 10 to 12 mini meatloaves.
- Place on foil that has been sprayed with cooking spray.
- Cook on grill over medium heat for about 30 minutes or until done (internal temperature of 165 degrees).
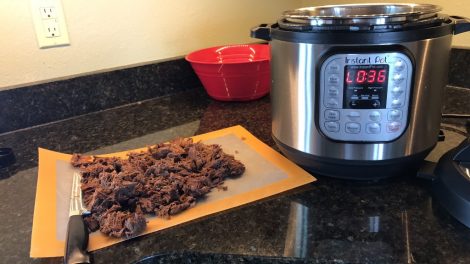
Pressure Cooker Mexican Venison
Ingredients:
1 tablespoon canola oil
1 medium onion chopped (about 2/3 cup)
2/3 cup chopped green pepper
2 cloves minced garlic
1 ½ cups water
4 beef bouillon cubes
2 frozen venison ball roasts (about 2.5 lbs each)
2 tablespoons chili powder
2 tablespoons cumin
½ stick butter
Directions:
- Turn the Instant Pot on sauté mode. Add oil and spread around. Then add onion, green pepper and minced garlic. Saute for a couple of minutes.
- Unwrap the beef bouillon cubes and put in the water. Add to pot.
- Add the frozen venison ball roasts.
- Sprinkle the roasts with the cumin and chili powder.
- Put the butter on top of the roasts. Put lid on and close/seal the pot.
- End the sauté mode. Change the setting on the Instant Pot to manual with a time of 80 minutes. Make sure the vent is pushed to seal. The meat will be cooked to the right internal temperature at 60 minutes, but the tenderness comes with that last 20 minutes of pressure cooking.
- Let the pressure release naturally then remove the lid. Take the venison out and place on cutting board. Chop into ½” – 1” pieces. Put the venison back in the pressure cooker and mix with the remaining liquid. You can use the keep warm feature or take the meat out, let it cool and put in the refrigerator to eat later.
Serving suggestions: flour tortillas, refried or black beans, lettuce, onions, salsa, or cheese – anything you like and use as a burrito filling! The meat could also be used in your favorite Mexican casserole!
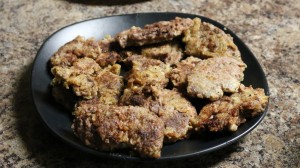
Fried Venison Steaks
Ingredients:
Venison Steaks
Milk
Eggs
Flour
Seasoning of choice
Instructions:
Tenderize meat (I use an LEM Hand Held Round Tenderizer).
Put eggs in bowl/pan and stir with fork.
Add milk.
Put flour in another bowl/pan and add seasoning of choice (I use Rotisserie Chicken or Kick’n Chicken seasoning).
Coat meat with egg/milk mixture, then coat with flour/seasoning mixture.
Pour oil into skillet or electric skillet until bottom is covered; heat to approximately 225 degrees (it must be fried at a low temperature!).
Cook on one side until you see blood come through, flip it and repeat.
Cook until crust is golden brown and meat is cooked completely.
Recipe by GrowingDeer Field Staff member Caleb Bettis, Arkansas. See Caleb cooking this recipe by clicking HERE.
After The Shot: Venison
At this time of year we frequently are asked questions related to how to handle a deer after harvest. Answering these questions can cause a bit of controversy because the way we process our deer after harvest is different from the way many hunters have traditionally been taught. Each region of the country has different methods on how they age and store their venison. What we do works for us, is simple, inexpensive, and provides good quality meat.
The basic answer to the “how long” and at “what temperature” questions is to remind hunters to use common sense. If you’re hunting in the southern portion of the United States on a warm day (70 degrees or higher) you don’t want to leave the deer in the heat and sunlight for very long. Hunters harvesting deer in colder climates will have a longer window before having to worry about getting the deer field dressed and in the cooler. In colder regions hunters have to worry that their deer might freeze in the field, which means the meat will not spoil but freezing may toughen it up.
We don’t field dress our deer. There are three reasons for this: we are close to our “skinning shed” so there is minimal time added for transport after harvest; cleanliness – this eliminates any concerns over the exposed meat getting dirt or debris on it in the field; and the need to collect “data” on the deer. After retrieving the deer we bring it back to the shop for weighing. We have a wench that pulls the deer up on a hanging scale. The weight of the deer is part of the data collection that is used to analyze the health of our local deer herd. (After all, Dr. Woods is a wildlife biologist. Gathering data is as critical to him as actually harvesting the deer!) To learn more about the data that Dr. Woods likes to have collected, click HERE.
After weighing the deer it is eviscerated using the technique shown in this video. There is a plastic tub (gut bucket) placed below the deer so that the innards can be cutaway and dropped cleanly into the tub. During this process it is important to pay attention to sanitation – keep your knife clean, try not to bust the rumen or intestines, etc.The next step is to skin the deer to get to the meat. Here’s a video where you can see the guys in the process of skinning one out.
If you’ve harvested a trophy buck and want to cape it out we have a good instructional segment that begins at the five minute mark in this video.
Removing the meat is the next step. We cut out each individual muscle which is very easy and makes for better tasting meat. Watch this video to see the step by step process.
After removal, we store the meat on ice in clean coolers for up to four days. The length of time to keep it on ice is arbitrary. We do not attempt to age the deer meat. It’s just not practical given that we do not have a walk-in cooler or second refrigerator. Nor do we think the meat is improved by aging. The Clemson University Extension explains it well: “Do not age any game carcass if it was shot during warm weather and not chilled rapidly, if the animal was severely stressed prior to the kill, if gunshot areas are extensive, or if the animal was under 1 year of age. Aging is not recommended for carcasses with little or no fat covering because they may dry out during aging, and are more susceptible to deterioration through microbial growth. If the meat will be ground into sausage, aging is unnecessary.”
Next, we bring the meat into the kitchen for further processing: removing the fat and connective tissue (the long streaks of white/silvery tissue running in and around the various muscle meat groups). The connective tissue is one of the primary culprits that make wild game tough or have an unpleasant “gamey” taste.
Once the connective tissue is removed, it’s easy to further process the meat into steaks or put it into the grinder. The final step is vacuum packaging the venison. Many years ago we wrapped the venison in butcher/freezer paper but found that it would often get freezer burn after 8 months. With vacuum packaging we rarely have any issues with freezer burn.
The Clemson University Cooperative Extension has produced a well thought out guide for hunters at this link. It is one of the best we’ve seen on the subject. I strongly encourage you to click through, read, and print it out for future reference.
No matter where you are or how you choose to process your deer meat, please make sure to follow basic sanitation and food safety practices. Remember, after the shot – it becomes meat for the table!
Growing (and eating) Deer,
Tracy Woods
Fried Turkey Nuggets
Ingredients:
2.5 lbs. wild turkey breast, cubed into nugget size pieces
Salt
Pepper
Powdered garlic
Basil
Dash of paprika
Dash of cayenne pepper
4 cups all-purpose flour
1 cup cornmeal
Oil, for frying
Directions:
Fill a fryer or deep pot halfway with oil.
Heat to 350 degrees F.
Sprinkle the turkey nuggets liberally with salt, pepper, powdered garlic, and basil.
Next sprinkle the turkey nuggets with a dash of paprika and cayenne pepper.
In a gallon size Ziploc© bag combine the flour and the cornmeal.
Add the nuggets to the Ziploc© bag, close, then shake to cover the nuggets with the flour mixture.
Remove the nuggets from the bag.
Using a slotted spoon place the nuggets in the fryer.
Deep fry for approximately 8 to 10 minutes until done.
Drain on paper towels.
Serve with baked potato or corn on the cob and a fresh green salad!
Variations:
- Marinate the turkey nuggets in your favorite BBQ sauce for a minimum of 30 minutes before breading (Grant likes a mustard base!).
- If you like a heavier breading, add 1 egg and ½ cup milk to the flour mixture (it should be roughly the consistency of pancake batter).
- Use this same batter recipe to cook fish, onion rings, mushrooms, etc. (And since you’ve tagged your turkey, what better reason to enjoy this beautiful spring weather than adding some fish to the menu!)
- If using it for cooking fish I recommend Old Bay or a cajun seasoning to replace the garlic and basil.
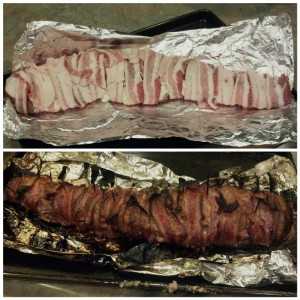
Grilled, Bacon Wrapped Loin/Back Strap Recipe
Ingredients:
- 1 large venison loin/back strap, butterflied down the middle and seasoned with pepper and garlic salt
- 1 package of bacon (approx. 2 slices of bacon per 1 ½ inches of loin)
- Toothpicks
- 8 oz. bar of cream cheese
- 4 oz. can of chopped green chilies (or if you like it spicy: 1/3 lb jalapenos cleaned, chopped and diced)
- 1 tsp. chili powder
- Heavy duty aluminum foil
Instructions:
Mix together the cream cheese, chili powder and peppers in your mixer.
Roll out aluminum foil and cut an amount that will “wrap” the loin: the length of loin long and about 12 inches wide. Put the foil on top of a baking sheet then place the loin on top of the foil.
Lay open the seasoned loin/back strap and spread/pack the cream cheese mixture down the length of the loin. Fold the loin back together, then…
Wrap 1 slice of bacon going in one direction and the 2nd piece the other (so there is no back strap showing and the cream cheese does not come out). Stick tooth picks in to hold the bacon on while grilling.
Fold the foil around the loin leaving the top open. Transfer venison package onto hot charcoal or gas outdoor grill.
Grill until all the bacon is cooked.
Some side dish ideas:
Baked potatoes – use the left over cream cheese and jalapenos on top
Corn on the cob – with pepper cream cheese as a spread
Mashed potatoes – with pepper cream cheese sauce*
*Cream Cheese Sauce: Over low heat combine pepper cream cheese (left over) and sour cream in equal amounts. Salt and pepper to taste with ½ cup cooking wine, simmer. It should be a little thick. This is also a very good sauce to use for the back strap. If the sauce is too thin use corn starch to thicken, simply follow the directions on box.
Thanks to Jessica and Ally Wright for sharing this recipe! I’ve made some tweaks to fit my family and the way I cook.


